

FM Radio Receiver Module DIY Electronic Kit 76-108MHz DIY Radio Speaker Kit Frequency Modification LCD Display Soldering Practice

 Direct purchase from the factory
Kev them nyiaj ruaj ntseg

 Tsoom dawb
 Kev soj ntsuam
 Kev rov qab
Tsoom dawb
Zoo siab txais tos rau Roymall, koj lub professional website yuav premium department store tsoom. Peb ntsuas thiab txaus siab rau koj kev pab, thiab peb xav qhia peb lub siab ua tsaug los ntawm ntxiv qhov zoo nkauj rau koj cov kev yuav khoom. Thaum koj yuav khoom nrog peb, koj tsis tas yuav tau cov khoom zoo thiab ua kom koj lub neej zoo dua, tab sis koj yuav tau txais ib qho tsoom dawb nrog txhua qhov kev yuav khoom. Npaj los nrhiav peb cov khoom thiab nrhiav koj cov tsoom zoo? Nrhiav peb cov khoom xaiv, sau koj qhov kev yuav khoom, thiab nqa koj lub siab rau kev zoo siab thaum koj cov tsoom dawb tuaj nrog koj cov khoom.Kev soj ntsuam
Peb yuav ua haujlwm hard kom soj ntsuam cov khoom rau koj tom qab tau txais koj cov kev yuav khoom thiab ua kom lawv mus kom zoo. Cov lus qhia soj ntsuam yuav muab rau koj hauv koj daim email confirmation.Hauv feem ntau, cov kev yuav khoom yuav raug kho hauv 2 hnub.Hauv cov xwm txheej tshwj xeeb, nws yuav raug delay raws li no: Thaum koj sau ib qhov kev yuav khoom hnub Saturday, Sunday lossis hnub so, nws yuav raug delay 2 hnub..Feem ntau, nws yuav tsum 5-7 hnub ua haujlwm (Monday mus Friday) tsis raug cuam tshuam los ntawm kev delay lossis lwm yam environmental factors..Vim peb cov kev soj ntsuam yog worldwide yog li cov sij hawm soj ntsuam yuav sib raug rau koj qhov chaw uas yog li nws yuav tsum tau ob peb zaug thiab thov ua siab ntev yog koj nyob hauv zej zog lossis lub teb chaws.1. Kev rov qab & hloov chaw
Peb tsuas yog txais cov khoom yuav los ntawm roymall.com. Yog tias koj yuav los ntawm peb cov khoom lag luam lossis lwm cov khoom yuav, koj tsis tuaj yeem rov qab lawv rau peb. Cov khoom kawg lossis cov tsoom dawb tsis txais tos rau kev rov qab. Kom muaj peev xwm rov qab, koj cov khoom yuav tsis tau siv thiab nyob rau hauv tib yam li koj tau txais lawv. Nws yuav tsum nyob rau hauv cov pob txha original.Tom qab tau txais cov lus qhia rov qab los ntawm peb, thov pob txha koj cov khoom rov qab thiab coj koj cov pob txha mus rau lub chaw hauv pob lossis lwm tus neeg soj ntsuam.Peb yuav kho koj cov khoom rov qab lossis hloov chaw hauv 3-5 hnub ua haujlwm tom qab peb tau txais nws. Kev them rov qab yuav raug kho thiab automatically them rau koj qhov kev them nyiaj ua ntej.Tsis muaj kev rov qab lossis hloov chaw yuav raug txais yog tias cov khoom yog tsim custom, suav nrog custom ntev, custom color, lossis custom sau ntawv.Xav tau ntau ntxiv pab, thov hu rau peb. service@roymall.com lossis Whatsapp: +8619359849471
2.Kev them rov qab
Koj yuav tau txais tag nrho cov nyiaj rov qab lossis 100% store credit tom qab peb tau txais koj cov khoom rov qab thiab tshawb xyuas nws. Kev them rov qab yuav raug kho thiab automatically them rau koj qhov kev them nyiaj ua ntej. Thov nco ntsoov tias cov nyiaj soj ntsuam thiab cov nyiaj fees tsis yog rov qab. Cov nyiaj soj ntsuam ntxiv tsis yog rov qab thaum cov pob txha tau soj ntsuam lawm. Koj yog tus neeg ua haujlwm rau kev them cov fees no thiab peb tsis tuaj yeem tso tseg lossis rov qab lawv, txawm tias koj cov kev yuav khoom rov qab rau peb.Thaum peb tau txais thiab paub tseeb tias koj cov khoom rov qab, peb yuav xa koj ib daim email kom paub tias peb tau txais koj cov khoom rov qab. Peb yuav qhia koj txog kev txais lossis tsis txais koj cov nyiaj rov qab.Yog tias koj muaj teeb meem nrog kev them rov qab, thov hu rau peb. service@roymall.com lossis Whatsapp: +8619359849471Introduction:
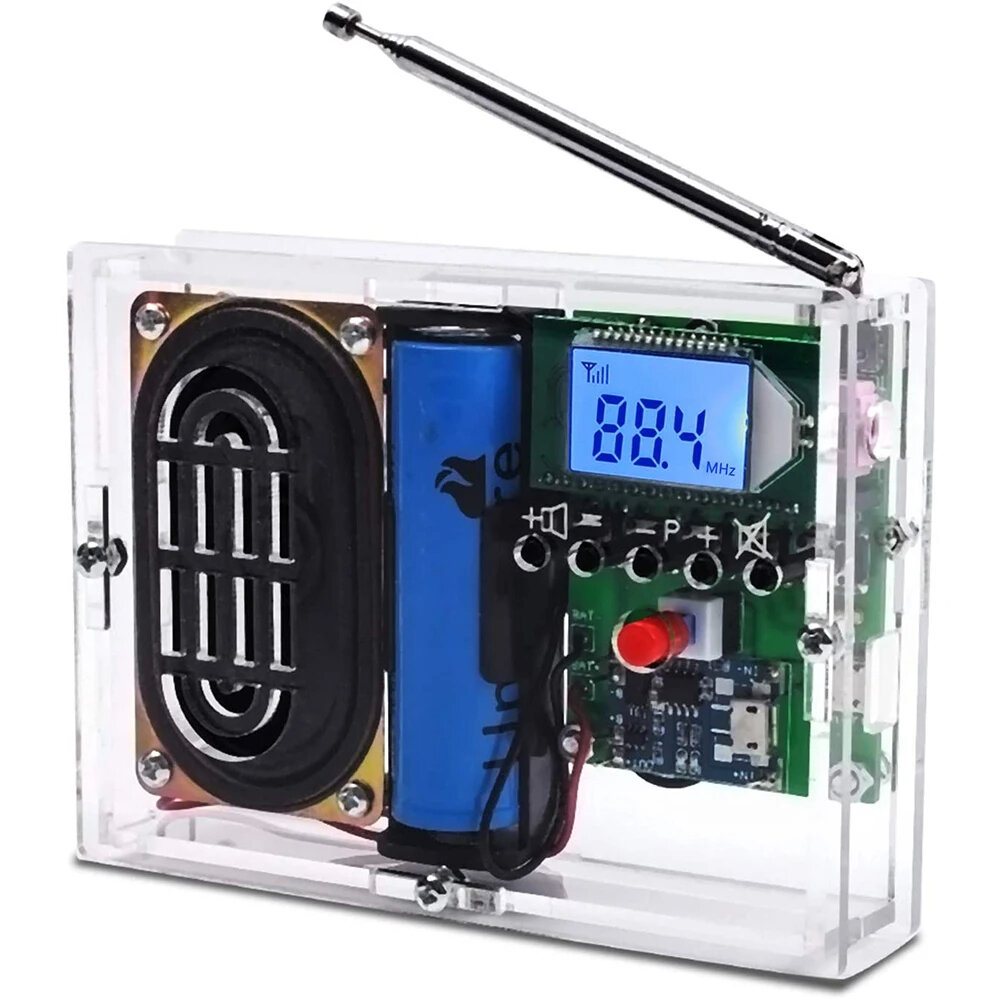
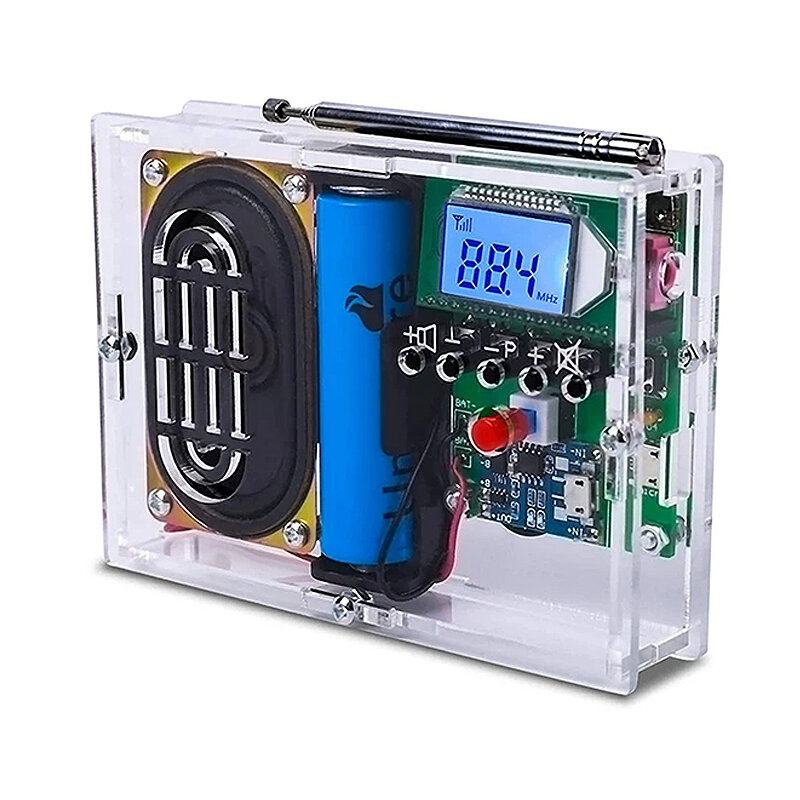
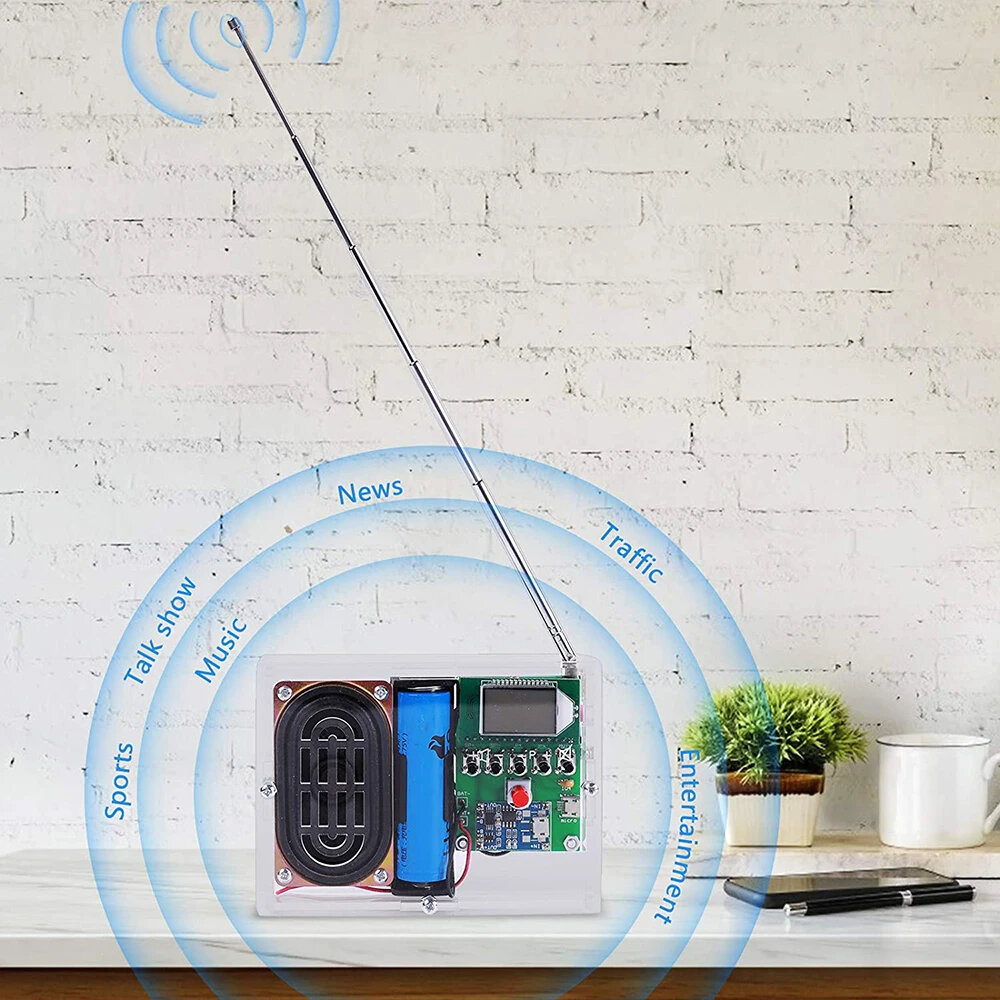
It is an 76.0MHz-108.0MHz Wireless FM Radio Receiver DIY Kit. It has a built-in high-definition display LCD display screen which can clearly display the receiving frequency and it can store 22 radio stations, which is enough to meet your needs.
Feature:
>>>Manual: Click here to open<<<
1. LCD Display FM Radio Receiver DIY Kit
2. Work Voltage: DC 3.0V~5.0V
3. Output impedance: 8ohm
4. Output power: 5W
5. Output channel: Mono for speaker and Dual channel for earphone
5. Frequency: 87.0MHz~108.0MHz (Disable CampussBroadcasting Band)
6. Frequency:76.0MHz~108.0MHz (Enable CampussBroadcasting Band)
7. Equivalent noise: >=30dB
8. Automatically search for radio stations
9. Built-in 30-level digital volume adjustment
10. Automatic memory function after power off
11. Built-in rechargeable module
12. Power saving mode with backlight off for 20 seconds
13. Support speaker and earphone audio output
Use Methods:
1. Keep press AUTO button to automatically search and store the radio stations that can be listened to.
2. Automatically name searchable stations like P01,P02,P02 and so on.
3. Press P+ and P- to switch saved stations.
4. Press V+ and V- to adjust volume from V00 to V30.
5. Switch CampusBroadcasting Band: Keep press V+ and V- before power ON and then turn ON work power switch. It means enable CampusBroadcasting Band if display C1 on LCD. It means disable CampusBroadcasting Band if display C0 on LCD.Available after restart.
6. Enable backlight mode: Keep press P+ and P- before power ON and then turn ON work power switch. It means keep backlight ON if display B1 on LCD. It means the backlight will turn OFF after 20second if display B0 on LCD(This is the power saving mode).Available after restart.
7. It can output audio from speaker and earphone jack. The speaker of the module does not work when the earphone is connected.
Note:
1. It cannot receive radio while it is charging.
2. It is a wireless module. So do not use it in an environment with siggnal interference.
3. Input charging voltage form micro USB on the bigger PCB.
Installation Tips:
1. User needs to prepare the welding tool at first.
2. Please be patient until the installation is complete.
3. The package is DIY kit. It need finish install by user.
4. The soldering iron can"t touch the components for a long time(1.0 second), otherwise it will damage the components.
5. Pay attention to the positive and negative of the components.
6. Strictly prohibit short circuit.
7. User must install the LED according to the specified rules. Otherwise some LED will not light.
8. Install complex components preferentially.
9. Make sure all components are in right direction and right place.
10. It is strongly recommended to read the installation manual before starting installation!!!
11. Please wear anti-static gloves or anti-static wristbands when installing electronic components.
Installation Steps (Please be patient install!!!):
Step 1: Install 1pc 39Kohm Metal Film Resistor at R1.
Step 2: Install 2pcs 10Kohm Metal Film Resistor at R2,R3.
Step 3: Install 1pc SOP-16 IC LM4863 at U1.There is a mark on one end of the IC and there is a mark on PCB where the IC can place on.These two marks are corresponding to each other and are used to specify the installation direction of the IC Socket.
Step 4: Install 1pc micro USB socket at J2.
Step 5: Prepare 6pcs pin header.
Step 6: Install 1pc Charging Module at J7 and fix by 6pcs pin header.
Step 7: Remove black fixed block from 6pcs pin header and fix Charging Module.
Step 8: Install 1pc 0.1uF Monolithic Capacitor at C2.
Step 9: Install 1pc 1uF 50V Electrolytic Capacitor at C1.Pay attention to distinguish between positive and negative.The Longer pin is positive pole.
Step 10: Install 1pc 3.5mm Audio Socket at J5.
Step 11: Cut a pin from 16Pin Female Socket.
Step 12: Install Female Socket at FM.Pay attention to the direction of the cut pin.
Step 13: Install 1pc Self-locking Button at S6.
Step 14: Install 5pcs 6*6*20mm Black Button at S1-S5.
Step 15: Install 1pc Self-locking Button Cap on Self-locking Button.
Step 16: Install 1pc Antenna at ANT.Note that the antenna should be installed on the front of the PCB.
Step 17: Install 1pc 18650 Battery Box at J1,J3.Pay attention to the positive and negative.Red wire is positive pole.
Step 18: Install 2pcs 15cm black Cable on speaker.
Step 19: Connect speaker to PCB at SP. The speaker does not distinguish between positive and negative.
Step 20: Install 1pc FM Audio Receiver on Female pins.Pay attention to the direction of the cut pin.
Step 21: Tear off the protective film on the surface of the acrylic shell.
Step 22: Install 4pcs M3*15mm Copper Pillar and 4pcs M3*10mm Screw on Acrylic bottom plate.
Step 23: Fixed speaker on acrylic bottom plate by 4pcs M3*6mm Screw.
Step 24: Install 3pcs M3*6mm Screw and 3pcs M3 Nut on Acrylic bottom plate.Note that the wire should not be placed between the PCB and the acrylic.
Step 25: Fixed main PCB on acrylic bottom plate by 3pcs M3 Nut.Note that the wire should not be placed between the PCB and the acrylic.
Step 26: Adjust the position of the battery box. Do not place the wires under the battery box. The wires can be moved to both ends of the battery box.
Step 27: Fix other acrylic plate by 6pcs M3*6mm Screw and 6pcs M3 Nut.
Step 28: Connect to power supply and enjoy the effect.
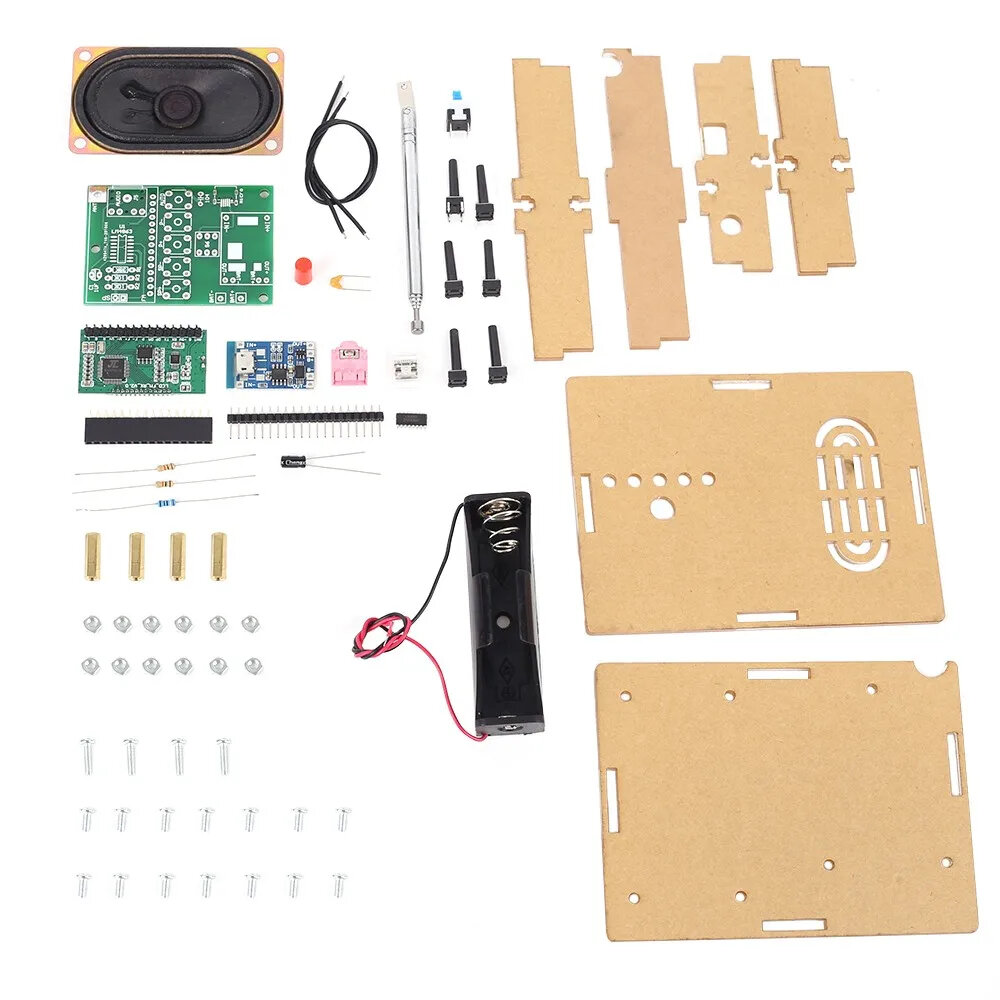
| No. | Component Name | PCB Marker | Parameter | Quantity |
| 1 | LM4863 | R7 | SOP-14 | 1 |
| 2 | 3.5mm Audio Socket | R1,R2.R4,R5,R8~R14 | 5Pin | 1 |
| 3 | Monolithic Capacitor | R3 | 0.1UF 104 | 1 |
| 4 | Electrolytic Capacitor | Y1 | 1uF 50V | 1 |
| 5 | Metal Film Resistor | C1,C2 | 10K ohm | 2 |
| 6 | Metal Film Resistor | TEA5767 | 39K ohm | 1 |
| 7 | FM Audio Receiver | LM386 | 41*22mm | 1 |
| 8 | Black Button | U1 | 6*6*20mm | 5 |
| 9 | Micro USB Socket | R6 | SMD | 1 |
| 10 | Antenna | C4,C5,C6 | 80mm-255mm | 1 |
| 11 | Female Pin | C3,C9,C11 | 16Pin | 1 |
| 12 | Self-locking Button | C7,C8 | 8*8mm | 1 |
| 13 | Self-locking Button Cap | Q1-Q4 | Red | 1 |
| 14 | 18650 Battery Box | 5V | 1 | |
| 15 | Male Pin | D13 | 7Pin | 1 |
| 16 | Charging Module | 056SMC_4 | 26*18mm | 1 |
| 17 | Cable | S4 | 15cm | 2 |
| 18 | Speaker | S4 | 8ohm 5W | 1 |
| 19 | Acrylic Shell | S1,S2 | 6 | |
| 20 | Copper Pillar | LM386 | M3*15mm | 4 |
| 21 | Screw | U1 | M3*10mm | 4 |
| 22 | Screw | X1 | M3*6mm | 14 |
| 23 | Nut | M3 | 12 | |
| 24 | PCB | SP | 1 |
Package Include:
1x LM4863
1x 3.5mm Audio Socket
1x Monolithic Capacitor
1x Electrolytic Capacitor
2x Metal Film Resistor(10Ku03a9)
1x Metal Fim Resistor(39Ku03a9)
1x FM Audio Receiver
5x Black Buttons
1x Micro USB Socket
1x Antenna
1x Female Pin
1x Self-locking Button
1x Self-locking Button Cap
1x 18650 Battery Box
1x Male Pin
1x Charging Module
2x Cables
1x Speaker
6x Acrylic Shells
4x Copper Pillars
4x Screws(M3*10mm)
14x Screws(M3*6mm)
12x Nuts
1x PCB


